A combination of odd number of vegetables (excluding onions, garlic and okra) used in the preparation of kozhambu is what is known as thal...
Thalatha Kozhambu or Thalagam
A combination of odd number of vegetables (excluding onions, garlic and okra) used in the preparation of kozhambu is what is known as thalatha kozhambu or Thalagam. It is served with the kali ( a sweet roasted and powdered rice mixed with jaggery) for a south Indian festival called Arudhra Dharshan. It is a festival that falls between December 15-January 15 in the Tamil month of Margazhi on a full moon and is celebrated on Shiva's birth star of Thiruvadhirai. On this day Lord Shiva takes the form of Nataraja and performs his cosmic dance which is the source of all energy in the universe. I loved this combination of sweet with tangy kozhambu and looked forward to it every year as a child. Here is the recipe for the thalatha kozhambu that I prepared this morning.
Gadgets:
Cutting Board
Measuring Cups
Knife
Spatula
Bowls
Blender
Heavy Bottom Stock Pot
Seasoning Wok
Ingredients:
Vegetables - ( 2 potatoes pealed, 2 Raw Banana, 1/2 egg plant, 2 Carrots, 1 cup white pumpkin, 1 cup yellow pumpkin, Edema beans - 1/2 cup, peas - 1/2 cup, Beans - 1 bunch cut into 2 inch pieces ( 9 different kinds of veggies)
Tamarind - lemon size ball
Water - 5 cups or more to cover the veggies
Salt
Sambar Powder - 1 tbsp
Coriander Seeds - 3 tbsp
Channa Dhal - 1 tbsp
Red Dry Chillies - 2
Coconut - 1 tbsp
Oil - 1 tbsp
Curry Leaves - a few
Asafoetida - 1 peas size ball or 1/2 tsp powder
Preparation:
1. Wash and cut all veggies into small chunks and soak the tamarind in 2 cups of water.
2. Heat the oil in stock pot. Add asafoetida and curry leaves. Then add the veggies, salt and mix well and allow to cook for a few minutes.
3. Add the sambar powder and mix well for 2 minutes. Then add the tamarind water and the rest of the water enough to cover all the veggies. Cover the pot and allow to cook for 10 minutes until all the veggies are cooked.
4. While the veggies are cooking, heat the seasoning with 1/2 tsp of oil. Add the channa dhal, dry chillies, coriander seeds and roast until the channa dhal turns golden brown. Add coconut and mix well. Transfer into a blender and blend into a fine powder.
5. Once the veggies are cooked ( test to see if the potatoes are done) then add this mixture to the veggies and allow to simmer for a few minutes and serve with the kali.
Until yesterday, I would have just not cared to buy that big a bag of cranberries from Costco. It was because of a phone call from my sist...
Cranberry Thogayal / Cranberry Chuntney : For A Umami Effect
Until yesterday, I would have just not cared to buy that big a bag of cranberries from Costco. It was because of a phone call from my sister that I did so. Thishya, our relative had called my sister and suggested for me to try it. This chutney/thogayal is a little different from others.The cranberries are not cooked and the fresh ones are made into a chutney. It has a strong sour and umami (thuvarpu) taste with south Indian flavor which is so tasty with curd rice, paratha, bread, dosai and rice. If you are pregnant you might really enjoy it.
Gadgets:
Blender
Seasoning Wok
Spatula
Measuring Cups & Spoons
Ingredients:
Cranberries - 2 cups
Oil - 2 tbsp
Asafoetida ( solid )- 1/4 of a marble size
Mustard Seeds - 1 tsp
Channa Dhal - 3 tbsp
Udad Dhal - 3 tbsp
Red Dry Chillies - 6
Jaggery / Sugar - 1 tsp ( adjust the quantity according to taste)
Salt
Preparation:
1. Wash the cranberries well and add to blender.
2. Heat the seasoning wok with oil. Add the asafoetida and fry in oil and wait till it puffs up and gets roasted.
3. Add mustard seeds and when it pops, add chillies, udad and channa dhal and roast until golden brown.
4. Add this to the cranberries in the blender along with the required amount of salt and jaggery/sugar.
5. Blend into a smooth paste and use to spread on bread, paratha, dosai or curd rice.
Quinoa is gaining a lot of popularity in the blogging world. Costco sells the organic quinoa in packets and local grocery stores carry ...
Quinoa Crepes / Quinoa Dosai In 5 Minutes
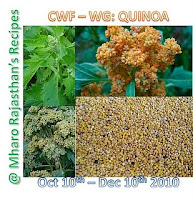
Quinoa is gaining a lot of popularity in the blogging world. Costco sells the organic quinoa in packets and local grocery stores carry red quinoa and quinoa flakes. I love the texture of them all and use them often. Quinoa flakes is super easy to work with and I made dosai with them to go with my coconut chutney. Seriously, just adding a bunch of things into the blender and your dosai/ crepe batter is ready. You can make dosai or uthapam with them and you would never know it has quinoa in it. Tastes almost like rava dosai and I liked it a lot. Addition of rava or cream of wheat might get it a lot more crunchy. I hope all of you enjoy this dosai as much as I did. I just found out that Priya (Yallapantula) Mitharwal is hosting the
CWF: Quinoa event and today is the last day. So here is my entry to this event.
Gadgets:
Blender
Measuring Cups and Spoons
Seasoning Wok
Spatula
Ladle
Iron pan
Cutting Board
Knife
Ingredients:
Quinoa Flakes - 1 cup
Rice flour - 1 cup
Water - 2 1/2 cups ( I used warm water)
Salt
Asafoetida - 1/4 tsp
Cumin Seeds - 2 tsp
Ginger - 1 inch
Green Chillies - 1 sliced
Curry Leaves - a few
Cilntro - 1/4 cup ( as much as you like)
Oil - 2 tsp plus extra for making the dosai/crepes
Mustard Seeds - 1 tsp
Preparation:
1. Measure the quinoa flakes, rice flour, salt, asafoetida, ginger into a bowl.
2. Add them into a blender with warm water and blend well.
3. Add cilantro, green chillies and curry leaves and mix well.( Sometimes I do add onions )
4. Heat the tava/ griddle to medium high add some water and then oil before making crepes or dosai's.
5. Serve with
coconut chutney.
If you like quinoa and are looking for other recipes check out these:
Thair Quinoa / Quinoa in Yogurt
Quinoa Salad Made Indian Style
Quinoa Flakes Porridge With Dry Fruits & Nuts
After coming to the U.S the one thing that I missed most when eating south Indian food, especially dosai or idli's was the coconut ch...
Coconut Chutney / Thenga Chutney
After coming to the U.S the one thing that I missed most when eating south Indian food, especially dosai or idli's was the coconut chutney. Initially, I used to think that it was because of the oil content in the fresh coconuts here that left an oily taste. Later, I found that when I used the frozen grated coconut it did not alter the taste that much. I always felt all my chutneys smelt of the Indian grocery store and the culprit was the roasted channa dhal or pottu kadai. I almost stopped making the coconut chutney at home until Mrs. Viswanathan suggested an alternative method. Instead of adding the roasted channa dhal, she suggested that I roast the required amount of channa dhal and add it to the coconut to make the chutney. This helped recreate the Indian coconut chutney that I wanted to have here and I have been enjoying them for years now. Here is the recipe to try.
Gadgets:
Seasoning wok
Blender
Measuring cups and spoons
Bowls
Spatula
Ingredients:
Grated Coconut - 1 1/2 cups
Channa Dhal - 3 tbsp
Ginger - 1 inch (fresh)
Curry Leaves - a few
Asafoetida - 1/4 tsp
Mustard Seeds - 1 tsp
Green Chillies - 1 ( add more for extra spice)
Dry Chillies - 1
Salt
Hot Water - 1/2 cup
Oil - 2 tsp
Preparation:
1. In a seasoning wok add 1 tsp oil and roast the channa dhal to golden brown.
2. Place the roasted channa dhal in a bowl and add 1/2 cup hot water and allow to soak for 10-15 minutes.
3. Once the dhal is soaked well and has become soft add the coconut, dhal, green chillies, ginger and salt into the blender and blend using hot water into a thick paste.
4. Heat the seasoning wok again with 1 tsp oil. Add asafoetida, mustard seeds, allow for the mustard seeds to pop. Add curry leaves and red chillies and mix it into the coconut chutney. Serve with dosai, idli, sevai or pongal.
Along with the winter holidays comes over eating, unhealthy eating, change in the weather which leads up to flu like symptoms. Personally,...
Amma's Home Made Cough Syrup
Along with the winter holidays comes over eating, unhealthy eating, change in the weather which leads up to flu like symptoms. Personally, common cold is fine but if it becomes worse and develops into a cough then it gets really uncomfortable. I have posted
here a recipe to prevent catching a cold, but this one that I am posting is when you are into it full swing and have a cough along with congestion. My mother made this for us (almost reminds me of the ad for gripe water) and now I make it for my nieces nephews and my daughter. I am currently having it myself because all the swift changes in weather has affected me too. Please do give it a try if you need to get some relief from cough. After reading this post most of you might wonder as to where you can find some of these Indian ingredients. You can find them in Asian or Indian stores.
Sauce pan
Measuring Spoon and Cups
Strainer
Blender
Ingredients:
Tulasi/ Holy Basil - 10 leaves ( thanks to my back door neighbour who grows them in huge bushes and for sharing some with me this afternoon)
Omavalli leaves/ Spanish thyme/ Mexican Thyme or mint/ Hung Chanh - 7 leaves or Omam/Ajwan Seeds - 1 tsp
Water - 1 cups
Honey - 2 tbsp ( can add more for additional sweetness)
1. Wash the leaves well. Boil the water and add the ingredients and allow to simmer for 5 minutes.
2. Grind the leaves and seeds into a fine paste.
3. Strain and have 1 tbsp three times a day with the required amount of honey.
A very colorful healthy salad to prepare with fresh carrots especially when you have unexpected guests for lunch or dinner. All you n...
Seasoned Carrot Salad / Carrot Kosmalli
A very colorful healthy salad to prepare with fresh carrots especially when you have unexpected guests for lunch or dinner. All you need are some carrots, moong dhal and a bunch of staple spices. Moong dhal adds an extra crunch and is very healthy ingredient to be included in our diet. A perfect salad that can be served with any kind of Indian or non Indian food. Sometimes, I make the same salad with cucumbers instead of carrots especially in summer which is very cooling for the body. This is very traditional salad that is served at south Indian weddings and during special occasions. I made them this Sunday and served along with onion kadhi, roasted taro root and rice for lunch.
Gadgets:
Food processor
Grater
Bowl
Seasoning ladle
Measuring Spoons
Peeler
Cutting Board
Knife
Ingredients:
Organic Carrots - 2
Green Chilies - 1
Mustard Seeds - 1 tsp
Moong dhal - 1/2 cup
Salt
Asafoetida
Curry Leaves - a few
Cilantro - 2 tbsp chopped
Grated Coconut - 3 tbsp ( fresh is better)
Oil - 1 tsp
Water
Lime Juice - 1/2 a lime
Preparation:
1. Soak the moong dhal in water for 20 minutes. Cut the two ends of the carrot, peel the skin and grate it. Cut the green chilies into thin slices.
2. Heat the seasoning ladle with oil and add asafoetida, mustard seeds (allowing for them to pop, please cover or else it will get all over the place) and green chilies.
3. If using desiccated shredded coconut, then you might want to add that to the above seasoning and toast it to golden brown before adding. If its fresh skip this step and add it fresh to the carrots.
4. Add the seasoning, coconut, cilantro, curry leaves, salt, lime juice to the carrots.Mix and serve.
With the onion kadhi I posted yesterday I served roasted taro root. I have another version of the taro root roast posted here , but this one...
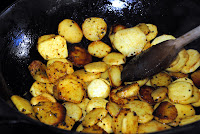
Easy Taro Root Roast/ Seppankizhangu Roast: Pressure Cooker Free Version
With the onion kadhi I posted yesterday I served roasted taro root. I have another version of the taro root roast posted
here, but this one is an easier version. Taro root is mostly pressure cooked and then roasted. I think this is kind of tricky. Sometimes, it gets mushy or under cooked. It is too much work if either happens. So yesterday, I tried the pressure cooker free version by peeling the taro root skin, cutting the root into thin slices and roasting them stove top. It turned out pretty good and all the gooey texture was easily tackled. If you have a lot to roast, I am sure broiling them will work just fine. So here is the pressure cooker free version for all those who do not own one and would still like to enjoy crunchy, roasted taro root/seppankizhangu.
Heavy Bottom Wok
Spatula
Cutting Board
Knife
Peeler
Measuring spoons and cups
Bowl
Ingredients:
Taro Root - 12
Salt
Turmeric Powder - 1/2 tsp
Chilli Powder / Sambar Powder - 1/2 tsp
Asafoetida - 1/4th tsp
Oil - 3 tbsp
Mustard Seeds - 1/2 tsp
Preparation:
1. Cut the edges of the taro root and peel the skin.
2. Cut into 1/2 cm discs of the root.
3. In a bowl add the taro root and coat it with 1 tbsp oil. Then sprinkle in the turmeric powder, chilli powder and salt and spread it well evenly over every piece.
4. Heat the wok to medium high and add 2 tbsp of oil, asafoetida and mustard seeds. Allow the seeds to pop and add the taro root and mix well. spread them evenly and roast them on medium heat. Serve hot with any kind of food.
The first time I tasted onion kadhi was when Renu, my sister-in-law made it for us. From that time I have been hooked on to it.. Renu alwa...
Onion Kadhi in 10 Minutes
The first time I tasted onion kadhi was when Renu, my sister-in-law made it for us. From that time I have been hooked on to it.. Renu always made something different from the normal day to day food. My sister and I have enjoyed all the meals she had prepared for us. One very memorable recipes of hers was the onion kadhi, the taste of which I can still recollect. We call it "Renu's onion kadhi" and I wanted to post it because it is one of the most relished and popular side dish any time. Over the years the recipe has evolved and one change that I have made to the recipe is, I roasted the besan with the onions instead of cooking it with the buttermilk directly. This assured that the besan gets well cooked. No sugar is added to this recipe because the addition of onions makes it sweet enough.
Gadgets:
Heavy bottom pan
Spatula
Measuring cups and spoons
Cutting Board
Knife
Ingredients:
Red Onion - 1 big ( diced or julienne)
Oil - 1 tsp
Ghee - 1 tsp
Asafoetida - 1/4th tsp
Mustard Seeds - 1 tsp
Turmeric Powder - 1/2 tsp
Curry Leaves - a few
Butter Milk - 3 cups
Besan/Channa Flour - 1 tbsp
Salt
Dry Red Chilies - 2 or 1 green and 1 red chili
Cumin Seeds - 1 tsp
Fenugreek Seeds - 1/4 tsp
Preparation:

1. In a heated pan add oil and ghee.
2. Add asafoetida and mustard seeds, allow it to pop and then add cumin, turmeric powder, dry chilies, curry leaves and mix well.
3. Add onions and salt and cook until they are well done.
4. Add besan and mix it well along with the onion and allow it to get cooked for a minute or two.
5. Remove from flame and add buttermilk and serve hot with rice or roti.
Guavas are one of the most nostalgic fruits for me. It brings back memories of the times I used to climb the guava tree in our back yard a...
Spicy Guava Salsa In 5 Minutes
Guavas are one of the most nostalgic fruits for me. It brings back memories of the times I used to climb the guava tree in our back yard and enjoyed some delicious guavas. In the U.S. we do find them on and off in the Indian stores. Guavas that we used to have in our back yard had a pink pulp on the interior. This variety is kind of hard to find in the U.S. But, yesterday I got a huge bag full of the pink variety of guavas from one of the grand fathers at school.One can classify him as a typical quiet dadaji/thatha types, who never failed to pick his grandson from school. I have been seeing him for the last year or so waiting patiently for the school gates to open. Every time I saw him I always acknowledged his presence and said hello. To that he would just smile and nod his head shyly. Yesterday at school he called out to me and gave me a bag of the most delicious guava's I have ever tasted in the U.S. It was ripe and was perfect for making salsa.
Gadgets:
Cutting Board
Knife
Measuring Cups and Spoons
Bowl
Whisk
Ingredients:
Guava's - 2 cups chopped
Salt
Chilli Powder - 1/4th tsp ( increase for more spice)
Lime Juice- 1/2 lime
Cilantro - 2 tsp chopped
Honey - 1 tsp
Preparation:
1. Cut the guava into chunky cubes. ( If it is ripe do not cut them into small pieces it will get mushy).
2. Mix lime juice and honey together.Mix the salt and chilli powder together.
3. Add the chilli powder salt mixture to the lime juice mixture and add the guavas and toss gently.
4. Toss in some cilantro and serve on the side as a salad, with chips or relish ( heard that it tastes great on fish).
A few weeks ago, there was a need to make a quick chutney to go with ragi dosa made with left over dosa batter. Generally, I would have op...
Onion Chutney/ Vengaya Thogayal
A few weeks ago, there was a need to make a quick chutney to go with ragi dosa made with left over dosa batter. Generally, I would have opted to make tomato or coconut chutney. Instead, I chose to make the chutney using onions which is one of my favorites. It went so perfect with the crunchy dosai for dinner that night and with hot rice the next day. Since the consistency was thick it served as chutney and thogayal. Next time when you are in a mood to try out a different chutney try this one.
Gadgets:
Cutting Board
Wok
Knife
Spatula
Blender
Measuring Spoons and Cups
Ingredients:
Onions chopped - 2 cups
Mustard Seeds - 1/2 tsp
Asafoetida - 1/4 tsp
Channa Dhal - 1/4 cup
Udad dhal - 1/4 cup
Salt
Dry Red Chillies - 2
Green Chillies - 1
Cilantro - 1/2 cup chopped
Oil - 2 tsp
Tamarind Paste - marble size
Preparation:
1. Heat the wok with some oil. Add asafoetida, mustard seeds and allow the seeds to pop.
2. Add the udad and channa dhal, dry and fresh chillies and roast until the dhal turn golden brown.
3. Add the onions and salt and cook until it turns transparent and is well cooked. Add tamarind and cilantro and blend to a thick chutney. Serve it with dosa, idli or on rice and veggies.
Some weeks ago I signed up for Foodbuzz taste maker program and totally forgot about the whole thing. Two days later I got two loafs of Ov...
Nature's Pride Oven Classic Oatmeal Bread Taste Maker : Avocado Sandwich
Some weeks ago I signed up for Foodbuzz taste maker program and totally forgot about the whole thing. Two days later I got two loafs of Oven Classics Oatmeal Bread from Nature's Pride. What caught my attention was it had "
No High Fructose Corn Syrup, No Trans Fat, No Artificial Coloring", 90 calories per slice and 40% less sodium, 8% whole grains, 4 gms of Protein. Since I had a lot of bread to use, I froze one loaf and used it when I needed toasted bread. I started to use the fresh bread in preparing peanut butter jelly sandwiches for my daughter.I made regular veggies sandwiches with them sometimes, used the bread in bread
chole . The toasted bread with a spread of butter was absolutely delicious. This morning I used the last few slices in preparing Avocado Onion Sandwich for the lunch bag.
Gadgets:
Cutting Board
Knife
Toaster
Sandwich Bag
Ingredients:
Nature's Pride Bread - 6 slices
Avocado (small) - 3
Onions - 1/4 sliced
Pepper
Salt
Butter (optional)
Preparation:
1. Toast the bread slices and spread some butter over the hot bread.
4. Add sliced avocado's and onions slices. Add some pepper and salt. Top it with another slice. Add it to the sandwich bag.
Okkarai is very popular traditional sweet from Tamil Nadu specially to the south most region of the state. Every family has its own tradit...
Okkarai : A Traditional Sweet For Deepavali
Okkarai is very popular traditional sweet from Tamil Nadu specially to the south most region of the state. Every family has its own traditions and its such a pleasure to follow them because it builds up memories which is all there is left in the end. In my husband's family okkarai is the sweet that is usually made for Deepavali. The okkarai that my mother in law Mrs. Pushpa Yegneswaran makes is very popular in the family. It is her recipe that I am going to post below. This was a totally new Deepavali sweet for me and because of her perfect recipe I have been able to make it every year. This sweet is loaded with protein and actually good for you and perfect to eat when it is piping hot off the stove. There are different versions to making okkarai. This version has a texture like a sooji halwa. Happy Deepavali to all and hope you have a fun filled, safe and peaceful one.
Gadgets:
Bowl
Measuring Cups and Spoons
Blender
Heavy bottom Vessel / Kadai ( a must)
Spatula
Ingredients:
It makes a big batch of Okkarai. So please adjust the quanity.
Channa dhal - 1 1/2 cups
Moong Dhal - 1 1/2 cups
Salt - a pinch
Ghee - 1/2 cup - 1 cup ( depends on how far you want to go)
Sugar - 2 1/2 cup ( U. S sugar), 5 Cups( India Sugar)
Cardamon - 8 pods powdered
Cashew Nuts or Almonds - 1/2 cup
Preparation:
1. Roast the channa and moong dhal in a kadai on medium heat taking care to not over roast them and aiming for a reddish color ( sevakka ).
2. Soak them in water for 3 hours and grind into a thick paste with a pinch of salt.
3. Heat the wok with some ghee add the cashew nuts and roast them. Remove the nuts and keep them aside.
4. Add some more ghee to the vessel / kadai and then the dhal mixture and cook on less than medium flame. Cook it by making sure to add tsps of ghee on and off and allowing all the water to disappear and a thick dough starts to form. Add sugar and mix well taking care to avoid lumps from forming. ( Lots of elbow grease). Keep adding ghee on and off and when you see froth forming in the sides when you flip add the cardamon powder and cashew nuts and serve them hot.
Its strange that for a couple of months I have been cooking food, especially sweets that I am very intimidated in preparing. After some ti...
Wheat Halwa / Godumai Halwa
Its strange that for a couple of months I have been cooking food, especially sweets that I am very intimidated in preparing. After some time I had stopped thinking about the out come and just did it. To my surprise some turn out so perfect the first attempt, while some I had to work at it. One such experience is godhumai halwa. I am no pro in these traditional sweets like my aunt, but I was ready to learn some important techniques that go unnoticed in many recipes. South Indian sweets are challenging for me. I am so happy that I am getting over the challenges of making ladoo, jangri or halwa. Here is what I was able to come up with.
Gadgets:
Blender
Measuring cups and spoons
Bowls
Heavy Bottom Vessel
Spatula
Colander ( with the fine mesh)
Candy Thermometer
Small Kadai
Ingredients:
Chamba Wheat - 2 cups ( made 2 cups of the wheat milk)
Sugar - 2 cups ( I would have liked 1 1/2 cups it was too sweet for me)
Ghee - 4 tbsp
Cashew Nuts / Almonds - 1/4 cup
Kesari Powder - 1/8th tsp
Cardamon - 6 pods
Saffron - a pinch
P
reparation:
1. Soak the whole wheat in water over 24 hrs. Helps grind easily. Add it into a blender and grind it into a smooth paste. Do not add too much water so the you can get thicker extracts.
2, Filter the mixture and put the remaining residue back into the blender and try to get more liquid out of it by adding some more water. Blend and pass it through the filter. You will see the remaining gluten in the residue.
3. Set the wheat milk aside and allow the water to separate from the wheat milk. Filter that water out and use the remaining wheat milk for making the sweet.
4. In a heavy bottom pan add the sugar and water just enough to cover the sugar. Allow it to melt and drop the candy thermometer inside. Cook the sugar until the temperature reached a soft ball consistency.
5. Turn the heat on medium. Add the wheat milk to it and keep mixing to avoid lumps from forming. As soon as the mixture comes together add some ghee and keep mixing. Add kesari powder, cardamon powder and saffron. Keep adding ghee when the halwa starts to stick to the sides. Keep adding ghee in tsps. It will absorb a lot more.
5. Heat a 1 tbsp of ghee in a small kadai and add the nuts. Toast them and add to the halwa.
6. When the halwa leaves the sides remove and serve it hot.
Note: A good way to serve this is in a bowl add a tiny bit of ghee and then add the hot halwa and top it with another drop of ghee. It appears that you are serving with a lot of ghee but its just a few drops.
Rasgulla is one of my most favorite and most nostalgic sweet since childhood. The first time I ever tasted it was when my father's fr...
Rasgulla / Cheese Balls In Sugar Syrup
Rasgulla is one of my most favorite and most nostalgic sweet since childhood. The first time I ever tasted it was when my father's friend bought us some in clay pots from calcutta. It contained some pink, yellow and white colored rasgulla's in various shapes which fascinated me as a child. Since then I have found this Bengali sweet irresistible. When I asked my daughter what she would like to have for Deepavali, she told me that she would like some milk sweet. I gave her a few options and she choose Rasgulla. In the past I have made rasgulla's but I always ended up with a chewy textured ones. This one tastes very fresh and perfect. It is such a simple sweet to make anytime once you have the fresh paneer. The portion below made about 30 rasgulla's.
Gadgets:
Pressure Cooker
Milk Cooker or Heavy Bottom Pan
Bowl
Colander
Cotton Towel
Measuring Cups and Spoons
Food Processor
Ingredients:
Organic Whole Milk - 4 cups
Vinegar - 1/4 cup
Water - 1/4 cup
Sugar - 1 1/2cups
Water for Syrup - 2 cups
Cardamon - 2 pods
Rose Water - 1 tsp
All Purpose Flour - 2 tsp
Rava/ Cream of Wheat - 1 tsp
Ricotta Cheese (slightly wet) - 1/2 cup ( if you cannot find ricotta cheese use paneer)
Preparation:
1. Boil the milk in a milk cooker. Mix 1/2 cup water and Vinegar and pour into the boiled milk and allow to curdle and become paneer.
2. Drain the liquid and wash the paneer in cold water well.
3. Place a cotton cloth inside the colander and drain the paneer well. Make a bundle with the cloth and squeeze out the extra water. Place it on the colander and keep something heavy on this bundle to get the excess water.
4. Add water and sugar to the pressure cooker and allow the sugar to melt.
5. Once the paneer is removed, place the ricotta cheese on the cotton cloth and make a bundle with it. Remove excess water from it and add it to the paneer mixture. This is a very important step to pay attention to.
6. Blend the food processor with paneer, ricotta cheese, rava and all purpose flour. The end product could be a semi creamy mixture. Remove and transfer into a bowl.
7. Make balls and start adding to the the sugar syrup. The cheese balls will expand so do not over pack them. Cover and pressure cook on medium to a whistle.
8. Once the pressure releases open the pressure cooker and add rose water and cardamon powder. Allow to cool, refrigerate and serve them cold.
Chole is a popular side dish in Indian cuisine. It is usually served with roti, naan, rice or on fast food like samosa or bread. A very...
Croutons Chole Chaat
Chole is a popular side dish in Indian cuisine. It is usually served with roti, naan, rice or on fast food like samosa or bread. A very popular way of having the chole in our household is on croutons. Serving the hot chole on crunchy croutons, topped with sweet and spicy chutney. potatoes and onions takes it to another level all together. What I like about this recipe is, people with allergies can also have this chaat using rice croutons( which tastes a whole lot better than regular croutons). It could be made in a jiffy with the store bought croutons. On the other hand it could be prepared by toasting regular bread at home. In the home made crouton version, it gives you versatility to add herbs and spices to the bread as per ones tastes. So, the next time you have some left over chole convert it into a whole new chaat for a snack.
Gadgets:
Bowl
Measuring Cups and Spoons
Cutting Board
Knife
Wok or Toaster oven or microwave
Ingredients:
Croutons ( plain, garlic, cilantro or mint croutons) - 1 cup
Chole - as per your recipe or
here - 1 cup
Potatoes - 2 boiled and pealed ( optional)
Sweet Chutney - 1 tsp
Green Chutney - 1 tsp
Onions - Finely diced - 1 tbsp
Cilantro - Finely chopped - 1 tsp
Green Chillies - 1/2 sliced
1. Warm the croutons in the microwave, toaster oven or wok and place it in a bowl.
2. Pour hot chole on top of the croutons and top it with the chutney's and onions. Garnish with cilantro and green chillies and serve it hot.
With Halloween season in full swing one tends to find a lot of pumpkins and butternut squashes everywhere.It was a couple of weeks ago whe...
Butternut Squash Paratha
With Halloween season in full swing one tends to find a lot of pumpkins and butternut squashes everywhere.It was a couple of weeks ago when I was out shopping with my daughter. Butternut Squash is not the kind of vegetable that I usually add to my cart when I shop at Trader Joe's. It was on her suggestion that I must try cooking with it that we did buy it. It has been sitting on my counter for over 3 weeks now. I must confess that I have not cooked with butternut squash until now. I have seen soups, chutney, pasta etc made with them. I was very nervous about cooking with it. It was not about the taste that I was worried about, but rather the texture. I wanted to create something mushy less.This evening I made butternut squash stuffed paratha, butternut squash halwa and coconut raita. I really enjoyed the combination because, though butternut squash is kind of sweet, the paratha was spicy, the halwa was sweet and the raita balanced the two dominant tastes. It will not be a one time paratha, but will be prepared often in my kitchen.
Gadgets:
Bowls
Food Processor / Grater
Spatula
Measuring Cups and Spoons
Griddle/ tava
Board and Rolling Pin
Wok/ heavy bottom pan
Ingredients:
For Butternut Squash Filling:
Grated Butter Nut Squash - 4 cups
Mustard Seeds - 1/2 tsp
Asafoetida - a few shakes
Kasturi Methi - 2 tbsps
Cumin Powder - 1 1/2 tbsp
Turmeric Powder - 1/2 tsp
Chilli Powder - 1 tsp ( mine was very spicy)
Ginger - 1/2 tsp grated
Salt
Oil - 1 tbsp plus extra for spreading on the paratha
For Roti:
Whole Wheat Flour - 3 cups plus extra for dabbing
Salt
Oil - 1 tbsp
Water
Preparation:
1. Grate the butternut squash in a food processor (or grater) after removing the outer skin.
2. Heat the Wok and add the oil. Once that heats up add asafoetida and mustard seeds. Once the mustard seeds starts to pop. Then add kasturi methi, turmeric and chili powder and give it a quick mix.
3. Add the grated butternut squash , salt and mix well. Allow it to cook for 5 minutes or until the butternut squash is cooked well. Remove from heat.
4. Meanwhile, mix the whole wheat flour salt and oil well before adding enough water to make a soft dough. Allow to rest for 10 minutes before making parata's.
5. Take a lemon size ball of dough and roll out a small circle. Spread a tbsp of the filling on one half of the circle and cover the filling with the other half to form a semi circle. Fold again to form a triangle.
6. Roll out the triangle evenly making sure to dab some whole wheat flour on and off to avoid sticking. Once the parata has been rolled into a triangle cook it on the iron griddle on medium heat on both sides until they are cooked well . Apply some oil on both sides. Serve them hot with coconut raita and butternut squash halwa.
Everyone has their own recipe for making noodles. I am sure all our versions are delicious. But sometimes I do like to deviate from the usua...
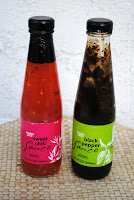
Vegetable Noodles With Black Pepper & Sweet Chili Sauce
Everyone has their own recipe for making noodles. I am sure all our versions are delicious. But sometimes I do like to deviate from the usual way with the addition of peanut butter or any such ingredient. Some months ago I found the black pepper and sweet chili sauce on the shelves of Trader Joe's. The black pepper sauce taste was closest to the
chettinadu karuvapillai garlic pepper kozhambu. When mixed with rice it becomes a perfect Indian rice variety. While the sweet chilli sauce had the sweet and spice effect which my daughter loves. It acts as a perfect dipping sauce and can be a great ketchup substitute. The sauces are great additions to pasta, but I liked it best on noodles. It added a lot more flavor to the regular veggie noodles. An entry to
MFF event: Oct 2010.
Wok
Spatula
Cutting Board
Knife
Heavy Bottom Pan
Colander
Measuring Cups and Spoons
Ingredients:
Noodles - 1 packet
Water - Enough to cook the noodles in
Salt
Onion - 1 medium size
Garlic - 3 cloves
Garlic - 1 inch
Carrots - 1/2 cup julienned
Bell Pepper - 1/4 cup julienned
Black Pepper Sauce - 1 tbsp ( or according to the spice levels you can handle)
Sweet Chili Sauce - 1 tbsp
Peanut Butter - 2 tsp heaped
Oil - 3 tbsp
Soy sauce - 3 tbsp
Green Onions - 1 bunch
Preparation:
1. Boil the water with some salt and add the noodles when the water comes to a boil. Cook as per the instructions mentioned in the noodles packet.
2. Heat the wok on high heat. Add oil allow it to heat up. Add onions, ginger, garlic and saute it. Add onions and bell pepper once the onions are half cooked.
4. Remove from heat. Mix the sauces and peanut butter to a smooth mix in a bowl and add to the veggies. Check to see if you would like more salt or spice.
5. Add the cooked noodles and toss with the veggies. Add green onions and serve it hot.
For many years I have been experimenting on making marinara sauce for pizza. I used to struggle with the consistency because the pizza wou...
Home Made Organic Marinara Sauce For Pizza
For many years I have been experimenting on making marinara sauce for pizza. I used to struggle with the consistency because the pizza would always get soggy. Though making a thicker chutney type of a sauce helps, I had to make many mistakes before I was able to get it right. This organic sauce stores well. It was very simple to prepare and most of the ingredients used were from the shelves of Trader Joe's.I used the marinara sauce to bake different shapes pizza for
24x24 event.
Can opener
Cutting Board
Knife
Measuring spoons
Heavy bottom pan
Spatula
Hand blender
Ingredients:
Organic Onions - 1 big (diced)
Diced Organic Tomato - 1 28 oz can
Organic Garlic - 2 cloves
Organic Basil Leaves - 10
Salt
Pepper
Pasta Seasoning - 1/2 tsp (spicy version)
Organic Olive Oil - 2 tbsp
Organic Sugar - 1/2 - 1 tsp ( depends on how tart you like your sauce)
Preparation:
1. Heat the heavy bottom pan and add olive oil.
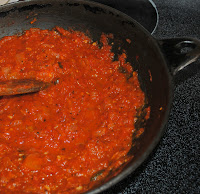
2. Saute onions and garlic along with some salt until they are well cooked.
3. Add the the can of tomatoes and allow it to cook on 5 minutes medium high heat. Add all the seasonings and allow it to cook for another 2 minutes.
4. Using a hand held blender roughly blend the mixture. Add basil and sugar, store in a bottle and use when needed.
To get the slimy thing out of the equation I always broil the okra. It can be roasted to become so crunchy and can easily pass off as garn...
Low Fat Crunchy Okra In Yogurt (Raita) / Vendakka Thair Pachidi
To get the slimy thing out of the equation I always broil the okra. It can be roasted to become so crunchy and can easily pass off as garnish or in raita. On the other hand it can be toasted enough to be used in preparation of bindi masala. This raita is very common to south Indian cuisine. Original recipe uses the stove top to roast the okra which requires a lot of oil. I thought it would be great to post this recipe because of the broiled low fat crunchy texture and taste of okra. It is super simple to make and makes life easy. Apart from all that, I thought the pictures were very interesting and unique. They were clicked by my husband with the help of the in house food stylists my daughter and niece.
Gadgets:
Cutting Board
Knife
Baking Tray
Measuring cups and spoons
Bowls
Whisk
Wok
Spatula
Ingredients:
Okra - 1 cups sliced into less than 1 cm disks
Salt
Oil - 1 tbsp
Chilli Powder - 1/2 tsp
Yogurt - 1 cups
Asafoetida - a few shakes
Mustard Seeds - 1/2 tsp
Curry Leaves - a few
Dry chilli - 1
Preparation:
1.Turn the oven to broil . Coat the baking tray and okra with 2 tsp of oil, salt, chilli powder and broil for 20- 25 minutes making sure to turn the okra every now and then.
2. Add 1 tsp of oil to the wok. Add mustard seeds, asafoetida, curry leaves and dry chilli and once the mustard seed pops remove from flame and add to yogurt.
3. Add the crunchy okra to the yogurt and serve.


12 Comments: